A WebGL case study in React Three Fiber, custom GLSL, texture maps, and holographic foil.
Live WebGL demo. Orbit the card, tune the foil controls, or open the full-screen version.
Ziggy Card started as a small GLSL practice project and quickly turned into a full material study: a laminated, holographic trading card rendered in the browser with React Three Fiber, Three.js, custom shader patches, texture masks, studio lighting, and a very photogenic staffy.
The goal was not a flat PNG with a rainbow overlay. I wanted the card to behave like a physical object: thin stock, dark core, printed faces, masked foil, roughness variation, iridescence, shimmer that responds to viewing angle, and guardrails for real browsers.
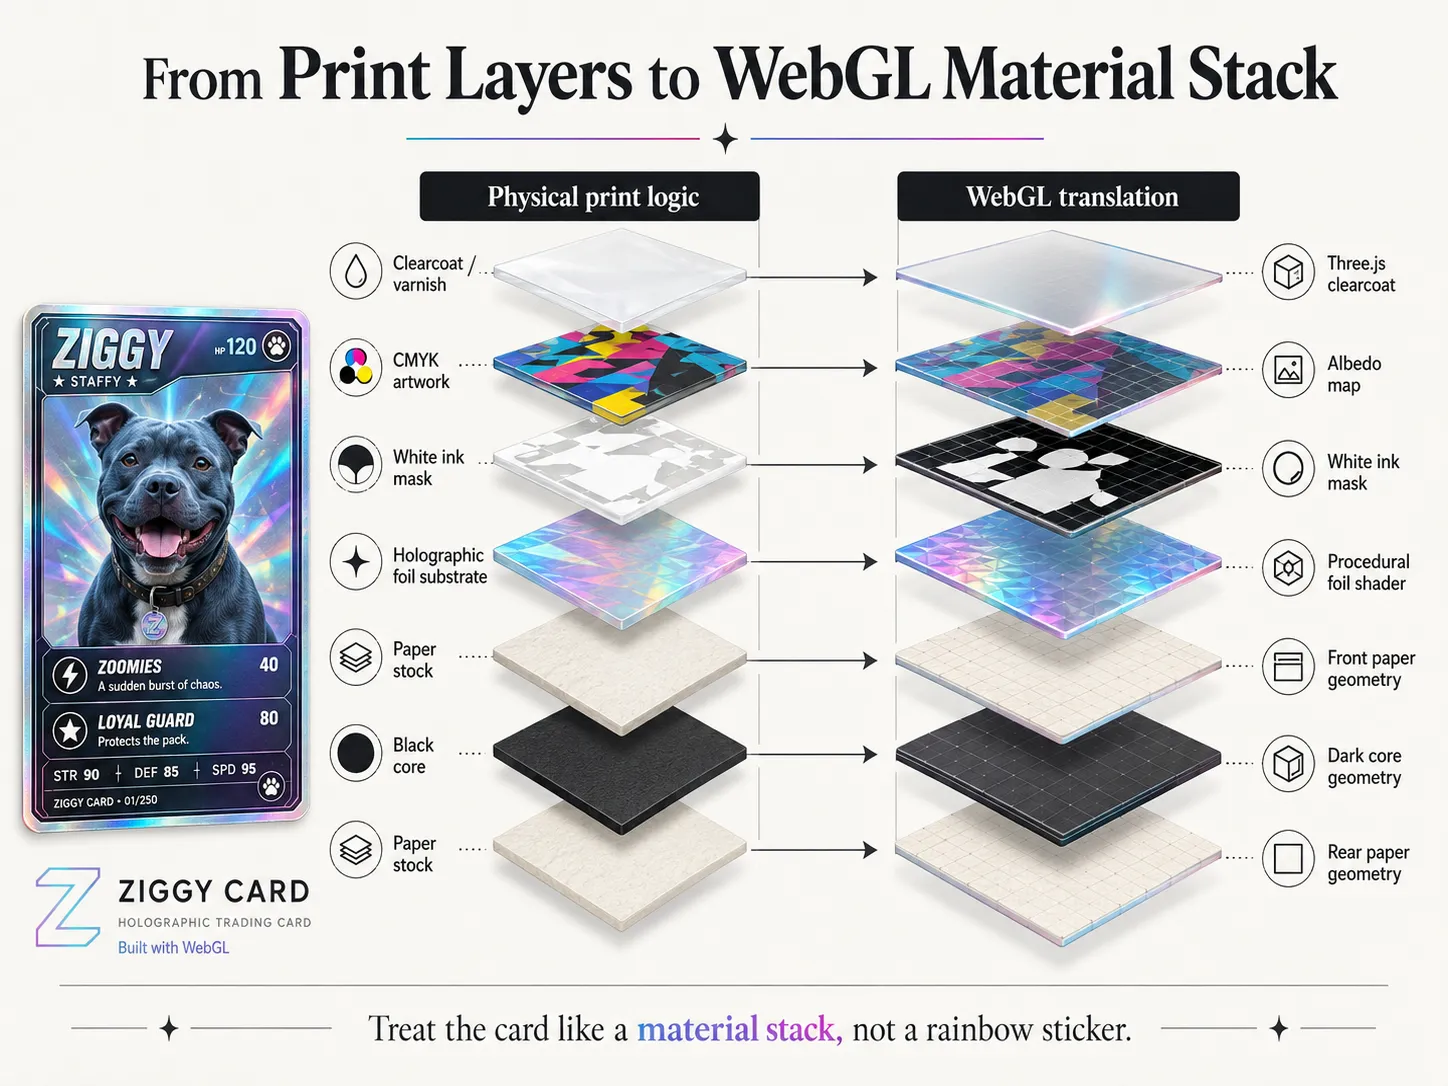
The core mental model: treat holographic foil as part of a layered material stack, not as a rainbow overlay.
The goal
Section titled “The goal”The card needed to hold up as a product shot, not just as a shader trick. That meant:
- a thin laminated body, not a chunky rounded box
- visible paper edges and a dark core
- a printed front and back face
- masked holographic regions
- roughness, metalness, normal, and foil pattern maps
- clearcoat and iridescence from Three.js’ physical material system
- view-angle-driven shimmer instead of a looping sparkle screensaver
- live art-direction controls through Leva
- WebGL and reduced-motion fallbacks for production use
The effect matters. The failure mode matters too.
Start with the object, not the shader
Section titled “Start with the object, not the shader”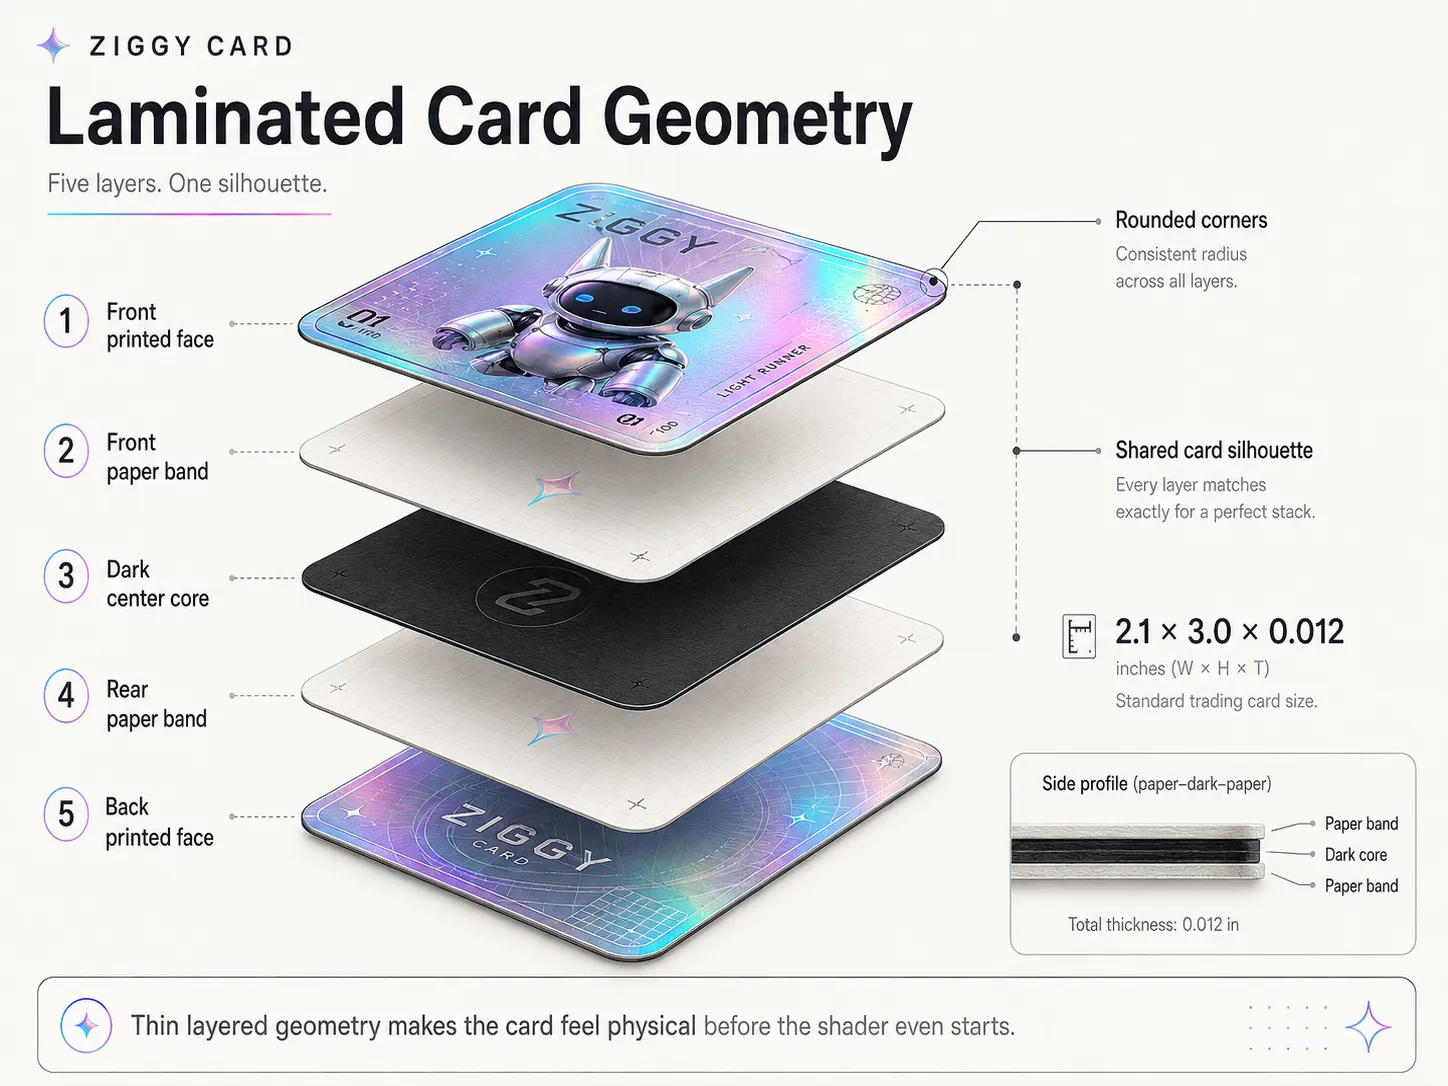
The card is modeled as a thin laminated object: printed faces, paper bands, and a dark center core.
The first important decision was treating the card as an object before treating it as a shader.
Real trading cards are thin. From the side you see paper, adhesive, an opaque core, and more paper. That edge detail is subtle, but it does a lot of realism work.
So the card body is built from three thin unbevelled rounded extrusions:
- front paper band
- dark center core
- rear paper band
Then the printed front and back are separate rounded ShapeGeometry faces placed just above and below the body.
The default dimensions are intentionally card-like:
const DEFAULT_WIDTH = 2.1;const DEFAULT_HEIGHT = 3.0;const DEFAULT_DEPTH = 0.012;const DEFAULT_CORNER_RADIUS = 0.12;That 0.012 depth is tiny against a 3.0 unit height, but it is enough to catch rim light. The card still reads as thin paper stock instead of a plastic prop.
The rounded outline is shared by every layer, so the paper, core, front, and back all have the same die-cut silhouette. The front and back UVs are remapped into ordinary 0..1 card coordinates, which means the artwork can stay as simple rectangular textures.
The mesh stays precise without forcing every texture into a custom layout.
Keep Three.js’ physical lighting stack
Section titled “Keep Three.js’ physical lighting stack”The tempting route for a shiny shader project is to write a full custom ShaderMaterial and handle everything yourself. I did not want to replace Three.js’ lighting stack just to add foil.
Instead, the front face uses a custom HoloCardMaterial class that extends THREE.MeshPhysicalMaterial.
Three.js still handles the serious lighting work:
- direct lighting
- environment reflections
- roughness
- metalness
- clearcoat
- iridescence
- normal mapping
- tone mapping
- color management
The holographic logic is injected through onBeforeCompile, replacing only the shader chunks I need to customize:
shader.fragmentShader = shader.fragmentShader .replace("#include <common>", `#include <common>\n${holoCommon}`) .replace("#include <map_fragment>", patchedMapFragment) .replace("#include <roughnessmap_fragment>", holoRoughness) .replace("#include <metalnessmap_fragment>", holoMetalness) .replace("#include <normal_fragment_maps>", holoNormal) .replace("#include <opaque_fragment>", holoOutput);That split is the point: Three.js handles the physically based material response, and the custom shader code handles only the foil-specific behaviour.
Replacing the whole material would have given me total control, but it also would have handed me lighting problems I did not need. Patching the physical material kept the demo grounded in PBR while still leaving room for the holographic effect.
Think in print layers
Section titled “Think in print layers”The texture stack is split by meaning rather than convenience.
The card uses separate maps for:
- front albedo artwork
- card back artwork
- holographic eligibility mask
- extra border foil mask
- roughness variation
- normal detail
- metalness / clearcoat regions
- procedural foil micro-pattern
In the project, those live under public/textures/ziggy/v2/ as files like albedo_text.png, holo.png, holo_border.png, roughness.png, normal.png, metalness.png, test.png, and card_back.png.
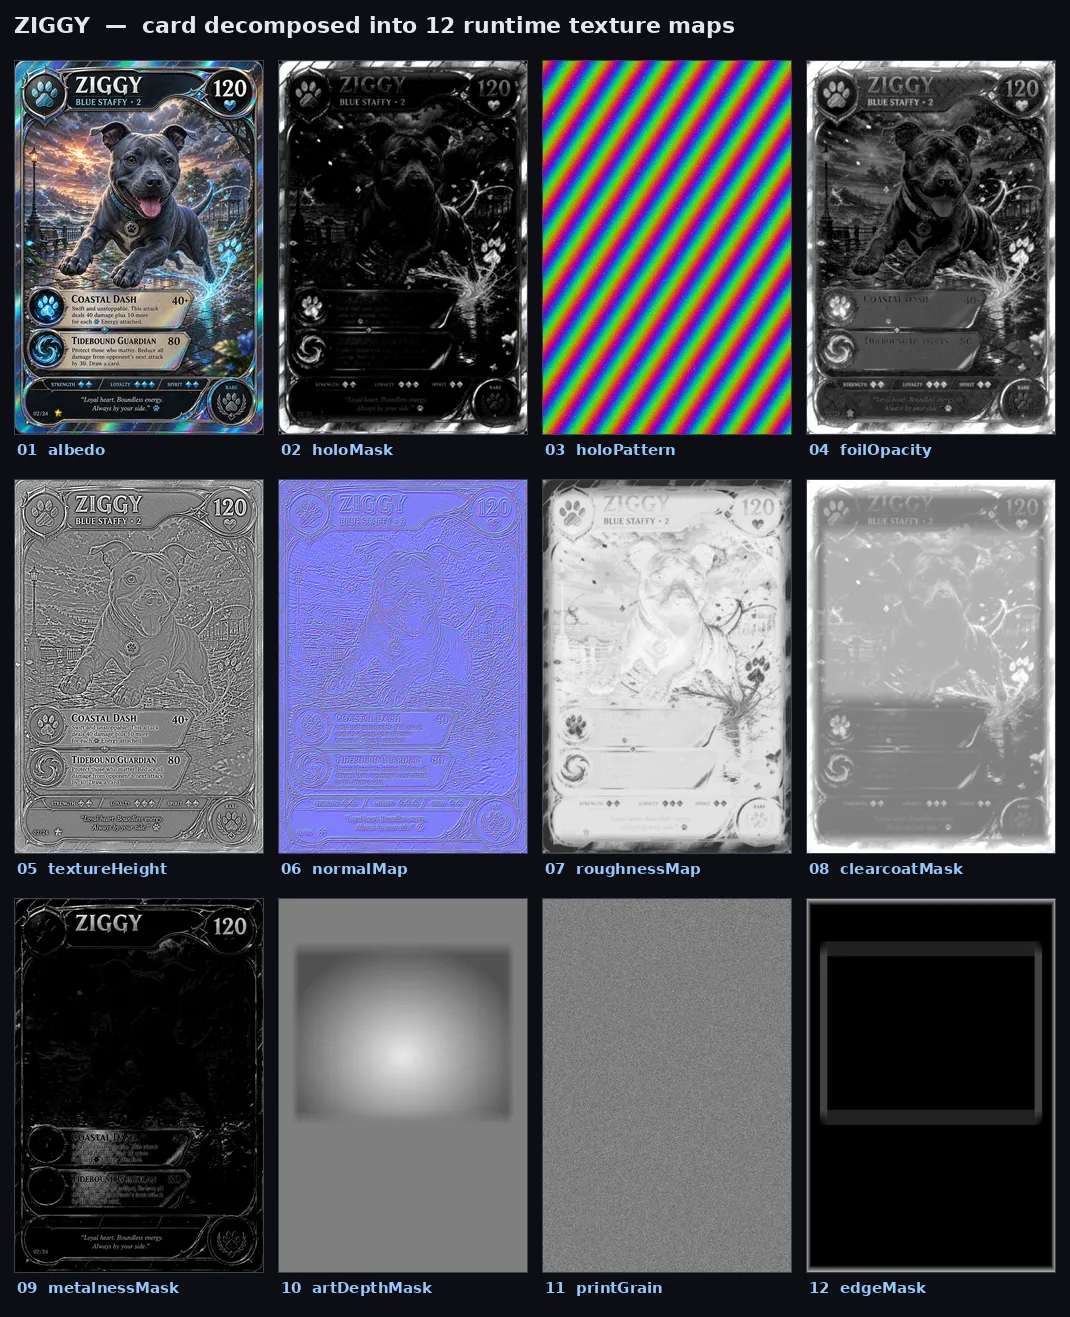
Early generative texture-map experiments, not the final shipped texture set.
The important idea is that the foil mask is not just a colour overlay. It controls where the material is allowed to behave like foil.
In shader terms, I build an exposedFoil value:
float exposedFoil = clamp( holoMaskValue * pow(max(1.0 - whiteInkValue, 0.0), 1.4), 0.0, 1.0);That value then changes multiple material properties:
metalnessFactor = mix(metalnessFactor, uFoilMetalness, exposedFoil);roughnessFactor = mix(roughnessFactor, uFoilRoughness, exposedFoil);This is the difference between “rainbow sticker” and “different substrate.” If a region is foil, it should change colour, roughness, and metalness together.
The white ink mask idea comes from print logic: opaque white can block foil from showing through, while transparent or coloured ink over foil lets shimmer survive. The WebGL version is a simplified version of that model.
Generate shimmer from the viewing angle
Section titled “Generate shimmer from the viewing angle”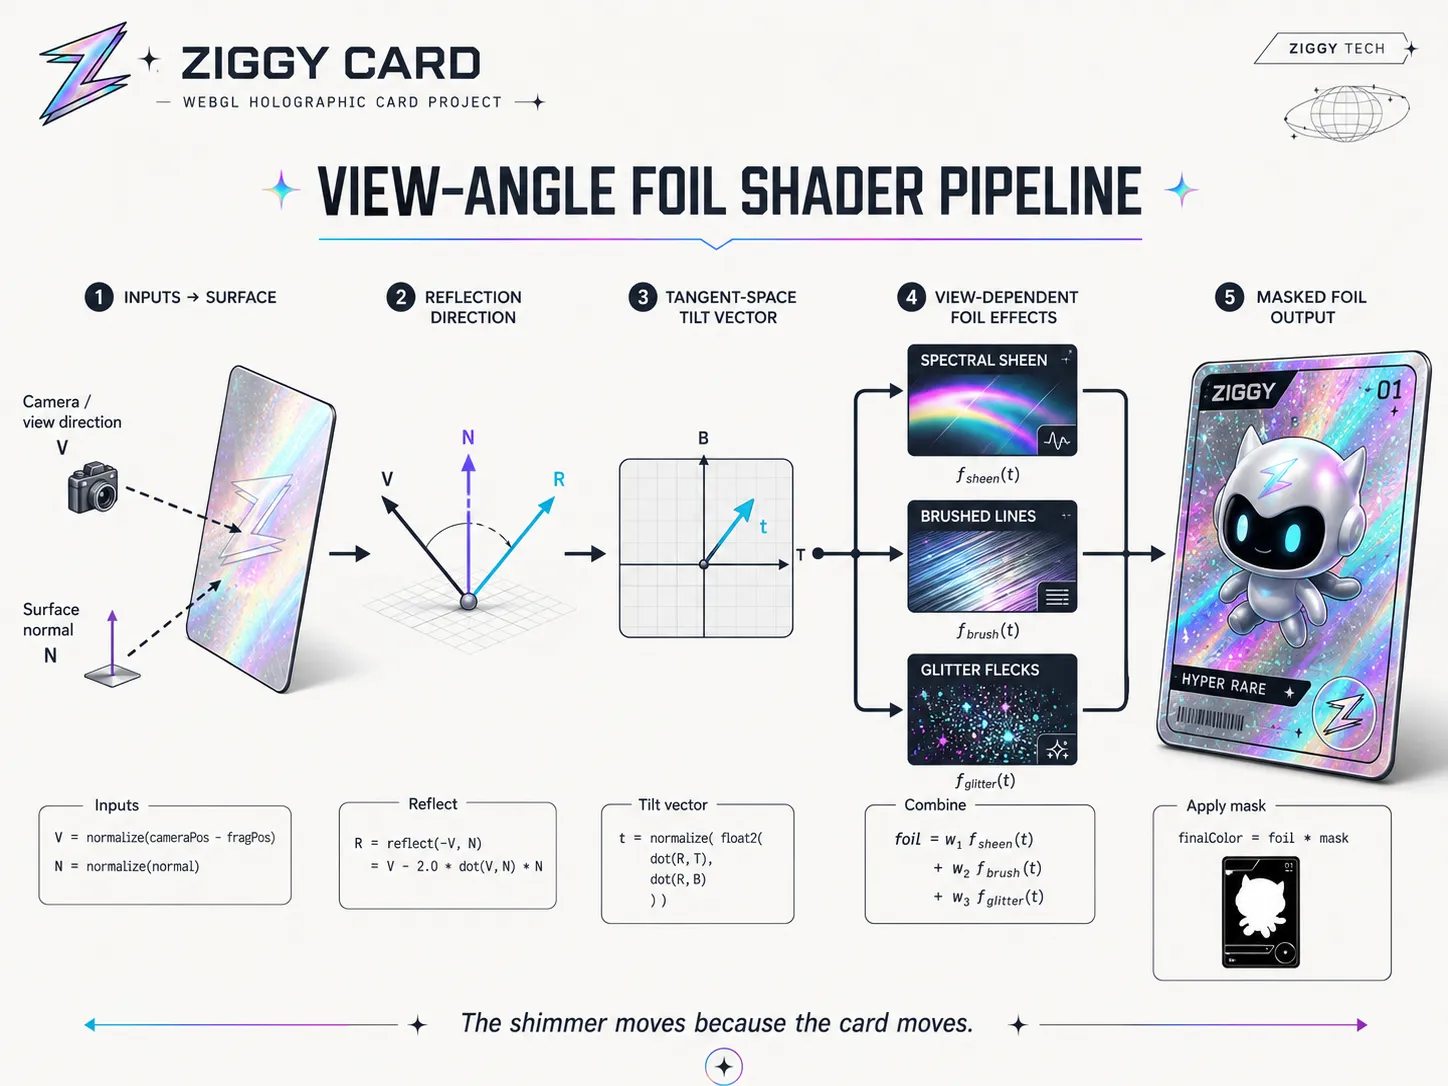
The shimmer moves because the card moves: view direction, surface normal, and tangent-space tilt drive the foil response.
The holographic colour is procedural. There is no animated rainbow video scrolling across the card.
The shader projects the reflected view direction into the surface tangent frame, producing a small 2D tilt vector. As the card rotates, the relationship between the viewer, surface, and reflection changes. That tilt value drives the hue shift.
vec3 viewDirection = holoSafeNormalize3(vViewPosition, vec3(0.0, 0.0, 1.0));vec3 surfaceNormal = normalize(normal);vec3 reflectionDirection = reflect(-viewDirection, surfaceNormal);
mat3 holoTbn = holoBuildTbn(-vViewPosition, surfaceNormal, vMapUv);
vec2 tilt = vec2(  dot(reflectionDirection, holoTbn[0]),  dot(reflectionDirection, holoTbn[1]));
That tilt value becomes part of the hue calculation:
float hue = along * uHue + dot(tilt, dir) * uTshift + (w - 0.5) * 1.2;vec3 sheen = 0.5 + 0.5 * cos(PI2 * (hue + vec3(0.0, 0.33, 0.66)));The foil look is built from three layers:
- a soft spectral sheen
- anisotropic brushed lines
- discrete glitter flecks
The brushed lines add the “manufactured foil sheet” feeling. The glitter flecks add the small flashes you get when a textured card catches light.
The shimmer works because it reacts to the same motion as the card. The effect stops feeling pasted on.
Let motion enhance, not dominate
Section titled “Let motion enhance, not dominate”The card has a gentle automatic sway, and the user can orbit around it. The shader also receives a uMotion uniform, but that value is not just a timer. It is derived from actual angular velocity.
Each frame compares the current quaternion with the previous quaternion:
const angularDistance = 2 * Math.acos(quaternionDot);const angularVelocity = angularDistance / safeDelta;const targetMotion = THREE.MathUtils.clamp(angularVelocity * motionSensitivity, 0, 1);That motion value gives sparkles and brightness a small lift:
foil += spark * uSpark * (0.7 + uMotion * 0.9);foil *= uBright * (0.85 + uMotion * 0.55);That keeps the effect from becoming restless. The card can be shiny without constantly animating for its own sake.
There is also a prefers-reduced-motion check. If the user has reduced motion enabled, the automatic sway stops. Manual orbit interaction still works because that is user-initiated.
That small detail is the difference between a prototype and something I would actually ship.
Color spaces matter
Section titled “Color spaces matter”One of the easiest ways to ruin this kind of effect is to treat every texture as colour data.
The albedo and card back are colour textures, so they use THREE.SRGBColorSpace. The masks, roughness, normal, and metalness maps are data textures, so they use THREE.NoColorSpace.
for (const tex of [albedo, backMap]) {  tex.colorSpace = THREE.SRGBColorSpace;}
for (const tex of [holoMask, roughnessMap, normalMap, metalnessMap]) {  tex.colorSpace = THREE.NoColorSpace;}
If a mask gets interpreted as sRGB, its numeric values shift. Then the foil thresholds, roughness values, and metalness blend become slightly wrong. Not broken enough to throw a useful error, just wrong enough to waste an afternoon.
Light it like a product shot
Section titled “Light it like a product shot”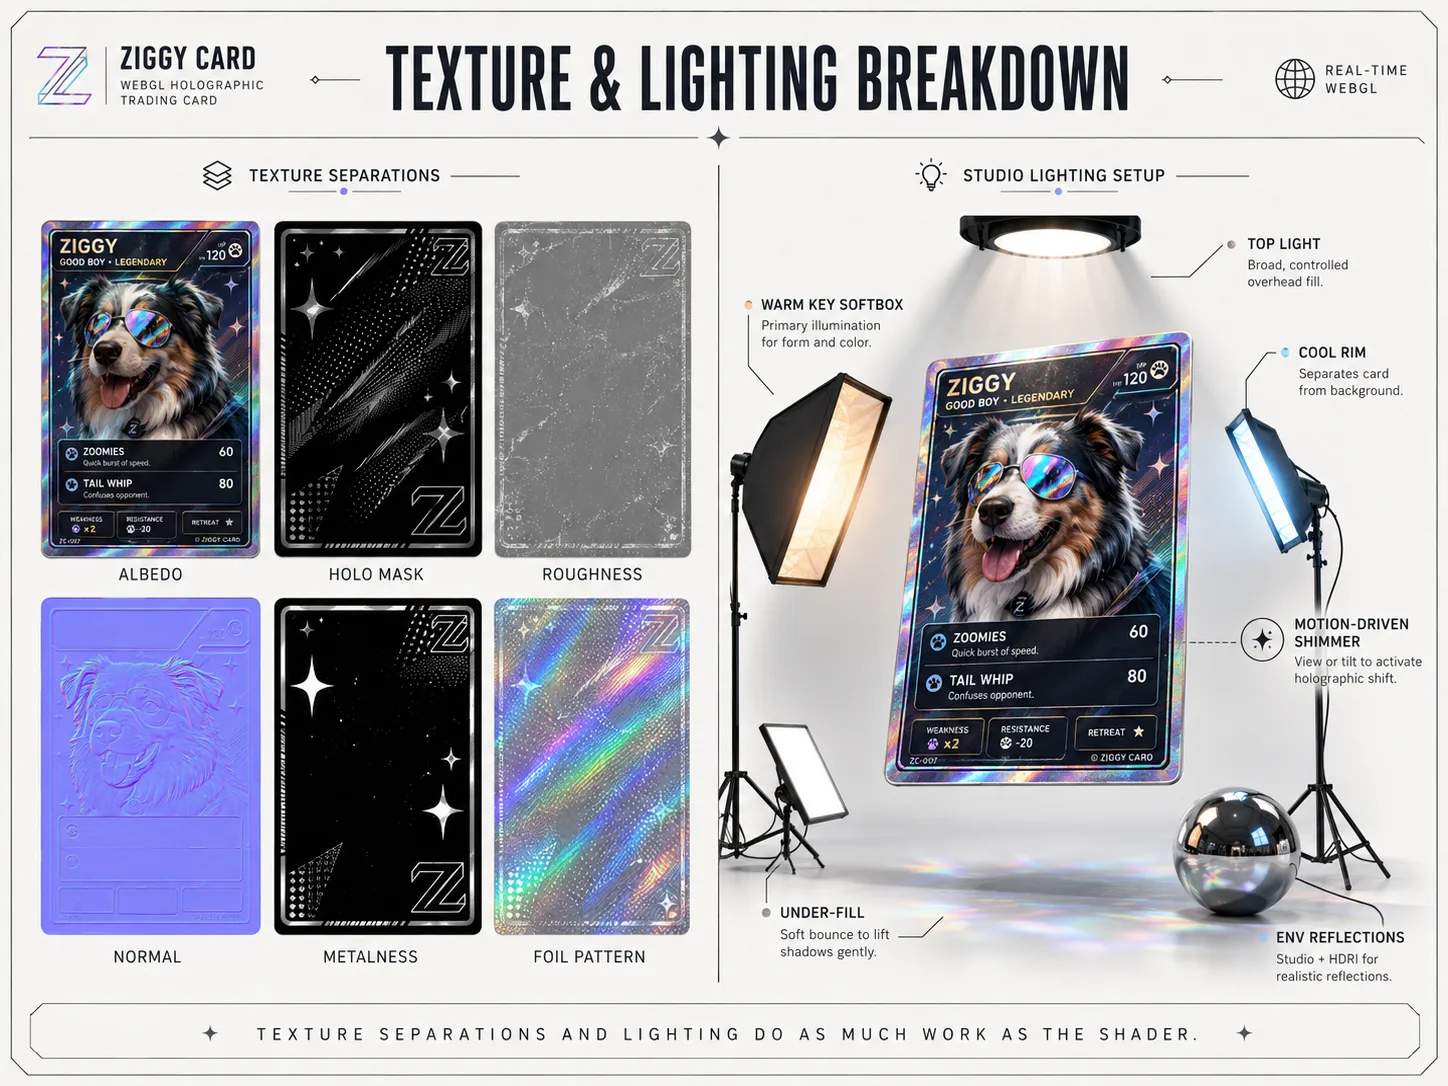
Texture maps and lighting do as much work as the GLSL. The shader needs good inputs and something useful to reflect.
Foil needs something to reflect. The shader can generate the spectral response, but the scene still has to give the card a world.
The demo uses a studio-style lighting setup:
- moderate studio environment reflections
- a large warm key softbox
- a cool counter-key
- narrow rim lights for the card edges
- a top hair light
- a subtle warm under-fill
- bloom, vignette, and a tiny amount of noise
A practical Three.js detail: RectAreaLight needs its lookup textures initialized before it renders properly.
RectAreaLightUniformsLib.init();The project wraps that in an idempotent helper called ensureRectAreaLightUniforms().
The lighting ended up doing almost as much work as the shader. Materials do not become convincing in isolation. They become convincing when the environment gives them useful light to respond to.
Make the thing tunable
Section titled “Make the thing tunable”Leva is used as the live control surface for the foil.
The demo exposes controls for hue cycles, tilt shift, milkiness, saturation, warp, line frequency, line angle, glint, sparkle, sparkle density, sparkle size, brightness, foil roughness, foil metalness, iridescence, and motion.
There are also named presets:
- Rainbow rare
- Cosmos
- Line holo
- Reverse
This made shader development much less painful. Instead of changing constants, refreshing the browser, and trying to remember what “slightly better” looked like forty seconds ago, I could tune the material in context.
That is the pattern I would reuse: build the art-direction knobs early, then save the good states as presets.
Browser-side compositing helped iteration
Section titled “Browser-side compositing helped iteration”The project includes a useCompositeAlbedo hook that draws multiple image layers onto a canvas and uploads the result as a CanvasTexture.
That lets the demo combine layers like the base albedo, the main holo mask, and a separate border mask without baking a new texture every time I want to test an idea.
For a fully productionized version, I would probably bake stable composites offline and ship compressed KTX2 textures. But during development, browser-side compositing was genuinely useful. It kept iteration quick and understandable.
Do the fancy thing where it matters, and do the boring thing where it helps you finish.
Guardrails matter
Section titled “Guardrails matter”The app checks for WebGL 2 before mounting the scene. If support is unavailable, it shows a useful message instead of a blank canvas.
function isWebGL2Available(): boolean {  if (typeof window === "undefined") return false;
  try {    const canvas = document.createElement("canvas");    return Boolean(canvas.getContext("webgl2"));  } catch {    return false;  }}
That is not the showpiece, but it is part of polished front-end work. The beautiful version should exist, and the failure mode should still be kind.
The same goes for reduced motion. The demo is allowed to be playful, but it should not assume every user wants a moving shiny rectangle wiggling forever in the middle of their browser.
What I would improve next
Section titled “What I would improve next”This version is a working portfolio prototype, but there are obvious next steps:
- compress the texture set with KTX2 / Basis
- add a static poster image and short video fallback
- bake stable composites offline once the art direction is final
- create a higher-resolution texture set for close-up product shots
- split the material into a cleaner reusable package
- add performance quality presets for lower-powered devices
- write a small visual debugging mode for each texture channel
I would also like to try a version with actual raised surface texture. Right now the detail is normal-based, which is a strong tradeoff for a web demo. A premium card with genuine tactile ridges would be the next serious upgrade.
What I learned
Section titled “What I learned”The biggest lesson is that convincing real-time visuals are rarely one trick.
Ziggy Card works because a bunch of small decisions support each other:
- the geometry has real layers
- the material stays inside Three.js’ physical lighting model
- masks control material behaviour, not just colour
- shimmer responds to view angle instead of time
- data maps and colour maps use different colour spaces
- motion is derived from card rotation
- lighting is treated as part of the material
- controls and presets make the shader tunable
- guardrails keep the demo from being fragile
I started this because I wanted to learn GLSL properly. The route ended up running through trading-card nostalgia, printed foil logic, texture maps, material patching, and an unreasonable amount of love for my dog.
Ziggy now has a holographic card. I learned a lot. The browser survived. Everybody wins.
Work with me
Section titled “Work with me”I’m Isaac Johnson, a senior front-end / full-stack engineer and creative developer building polished, playful, production-ready interfaces across React, TypeScript, design systems, WebGL experiments, and indie game systems.
I’m currently open to work with teams that need calm technical judgment, strong front-end execution, creative tooling, interactive 3D, or someone who can make complex browser things feel charming instead of cursed.
You can read my resume at zackabrah.github.io.